
Developers guide to pydidas Plugins#
Pydidas plugins are separated into three categories:
InputPluginsare used to load data from the filesystem.ProcPlugins(short for ProcessingPlugins) are used for processing data. They ingest aDatasetand return aDataset.ProcPluginscan either modify the input data or create new data.OutputPluginscan be used to export additional data or data in specific formats. Usually, data export is handled through the generic infrastructure and need not be handled by plugins.
All pydidas plugins must inherit from one these base classes to be discoverable: Pydidas searches for plugins automatically in the custom plugin paths.
Tip
These custom plugin path can be modified by the user (please see
pydidas QSettings for a guide on how to update the
user/plugin_path manually or use the The User config window to update
the paths in the GUI).
Multiple paths need to be separated by a double semicolon “;;”.
Plugin structure#
Plugins include a number of class attributes for permanent configuration (which
will be discussed in detail later) and uses the Parameter class to handle
dynamic configurations.
The two main methods are the pre_execute which is called once at the start of
processing and which can handle computationally expensive tasks which need to be
performed once. The execute method is called repeatedly with the processing
data and ingests one input Dataset and returns one Dataset. The figure below
shows a sketch.
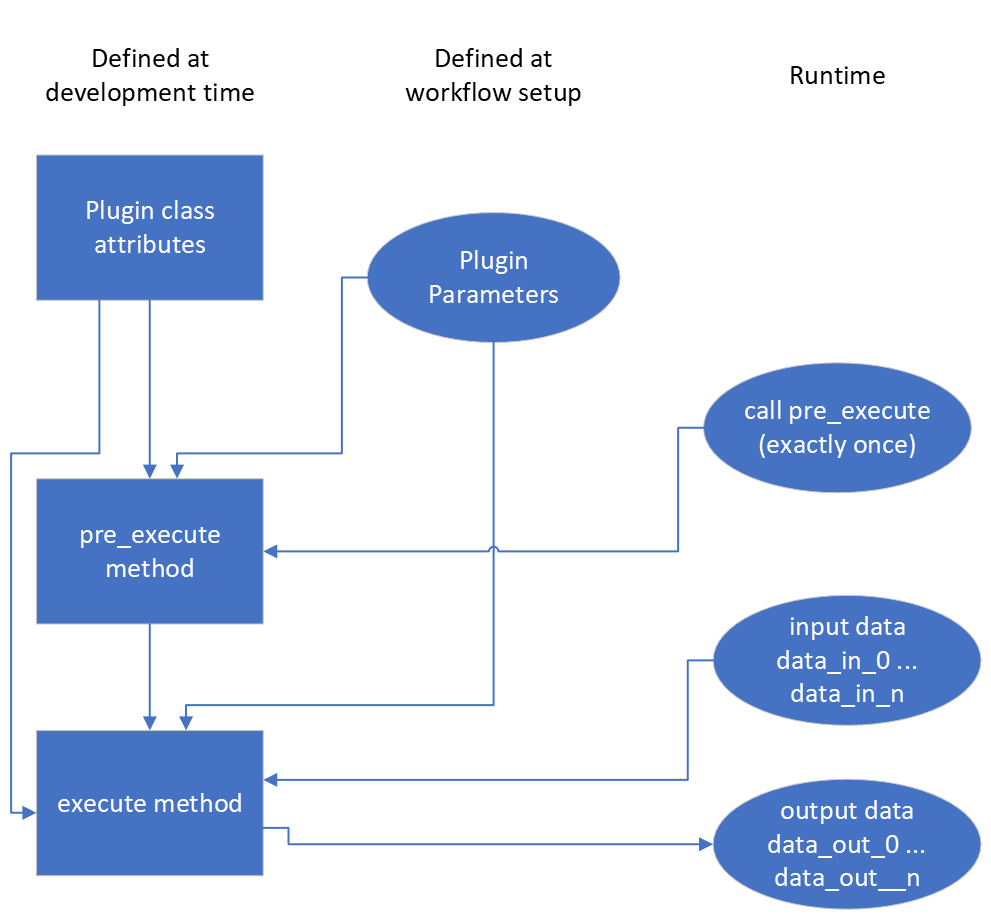
The simplified Plugin processing diagram. The execute data processing
method can be called as often as necessary while the pre_execute method
will be called exactly once.#
Plugin class attributes#
The following class attributes are used by pydidas to define the generic behaviour of the plugin.
Class attribute |
Type |
Description |
|---|---|---|
|
int |
A key to discriminate between the different types of plugins (input,
processing, output). Please use one of |
|
int |
Processing plugins are further differentiated into plugins for generic
data, image data or for integrated data. This differentiation is just
for plugin organisation to simplify finding plugins for users. Leave
this field empty for |
|
str |
The plugin name key in human-readable form for referencing the plugin. Usually, this should be similar to the class name but with inserted spaces and correct capitalization. |
|
A ParameterCollection with the class parameters which are required to
use the plugin. The default is an empty |
|
|
int |
The dimensionality of the input data. Use -1 for arbitrary dimensionality. The default is -1. |
|
int |
The dimensionality of the output data. Use -1 for arbitrary dimensionality. The default is -1. |
|
str |
The data label for the output |
|
str |
The data unit of the output |
|
bool |
Keyword that the Plugin creates a new |
|
list[str, …] |
A list with the keys of “advanced parameters”. These Parameters are hidden in the plugin’s Parameter configuration widget be default and can be accessed through the associated button for “advances parameters” not to overwhelm users with too many options. The default is an empty list []. |
Generic plugin attributes and methods#
This section describes the generic attributes and plugin methods and classmethods which all plugins inherit and use.
Generic attributes#
Plugins have a number of attributes which are used to store and modify the plugin’s state. The following attributes are used by all plugins:
_config(type:dict):The plugin’s configuration dictionary. This dictionary is used to store all plugin-specific data which is not stored in the Parameters. Using a dictionary allows to easily copy the plugin and its configuration without needing to consider which attributes must be copied.
node_id(type:int):The plugin’s unique node ID. This ID is used to identify the plugin in the workflow.
params(type:ParameterCollection):The plugin’s ParameterCollection. This collection is used to store all the plugin’s Parameters.
Plugin classmethods#
Multiple class methods have been defined for the basic plugin to manage the
representation of the plugin class in the PluginCollection. For details,
please refer to the API documentation of the BasePlugin.
Generic properties#
The following properties are used to access the plugin’s configuration. Note that there are no setter methods defined for these properties.
input_data(type:Union[int, Dataset]):The stored input data. Note that the input data is only available after it has been stored by the
store_input_data_copymethod.
result_data_label(type:str):The data label for the output
Dataset. This property gives a formatted string including the output data unit.
result_title(type:str):The plugin’s title. This property gives a formatted string including the plugin name and the node ID.
Generic methods#
The following generic methods are defined and used by all plugins. The default behaviour is described as well to know when to overload these methods.
pre_execute:The
pre_executemethod is called once at the start of the processing. This method can be used to perform computationally expensive tasks which need to be performed once. It does not accept any arguments.
get_parameter_config_widget:This method returns a widget instance for the plugin’s parameter configuration. The default implementation raises a
NotImplementedError. This method is only used if the class attributehas_unique_parameter_config_widgetis set toTrue. The plugin is responsible for passing itself / itsParameterobjects to theQWidgetinstance.
store_input_data_copy:This method stores a copy of the input data and input kwargs in the plugin. This might be required, for example, to use the input data later, for example when calculating intermediate results.
Defining plugin Parameters#
The plugin’s ParameterCollection with access to all Parameter objects is
defined in the default_params class attribute. The type of the
default_params attribute is a ParameterCollection. A number of generic
parameters is defined in the pydidas.core.generic_params module. A
generic Parameter can be created by using the get_generic_parameter function, for example
get_generic_parameter("filename"). Multiple generic Parameter objects can
be created at once by using the get_generic_param_collection function.
It is worth noting that each plugin instance, will be initialized with a copy of
the default_params ParameterCollection. Therefore, plugins do not
share any Parameter objects with other plugins.
For further examples of how to define the default_params, please have
a look at the Plugin default parameter definition examples.
Please also see Generic Parameters for a complete list of all available
generic Parameter.
Handling dynamic data dimensionality#
Some plugins should always handle 1-dimensional data but can be supplied with multi-dimensional input data. For example, a plugin can be designed to work with an integrated azimuthal line profile, but should also work with a series of line profiles which are generated from a two-dimensional integration.
Pydidas provides a mechanism to handle this situation by using the
process_1d_with_multi_input_dims decorator on the execute method. This decorator will
requires the process_data_dim Parameter which is defined in the
generic parameters.
The process_1d_with_multi_input_dims decorator will automatically handle all necessary steps
and the execute method must be written as if it handled 1-dimensional data
only.
Please see the Handling dynamic data dimensionality example for further details.
Intermediate and detailed results#
For some applications, it is useful for the user to have access to intermediate
results of the processing, for example for fitting or automatic classifications.
The intermediate results are used for automatic visualization and therefore
require a specific form. Pydidas provides an automatic mechanism to access
intermediate results. The plugin’s _details attribute is used to
store the intermediate results as a dict with a None key
and a dict value. The detailed_results_dict details will
be laid out below.
A detailed_results property must also be defined to access the
detailed results.
def execute(self, data: Dataset, **kwargs: dict) -> tuple[Dataset, dict]:
    # Do some processing
    if kwargs.get("store_details", False):
        self._details = {None: detailed_results_dict}
    return data, kwargs

@property
def detailed_results(self) -> dict:
    return self._details
The rationale behind this is that detailed results must also be available for
plugins which allow dynamic data dimensionality. In this case, the
process_1d_with_multi_input_dims decorator stores the detailed results with the correct keys
and None was selected as generic key because no data will use the
None key.
The detailed_results_dict also has a defined structure. The following
keys are required:
n_plots(type:int):The number of plots used by this Plugin.
plot_titles(type:dict):A dictionary with the plot titles. The keys are the plot indices and the values are the plot titles. Example
"plot_titles" : {0: "Title A", 1:
"Title B"}
.
metadata(type:str):Additional metadata to be given to the user. The metadata must be in string format and if a specific formatting is required for readability, the plugin must provide this formatting.
items(type:list[dict]):A list with the individual items to be plotted. Each item must be a dictionary with the following keys:
plot(type:int):The index of the plot to which the item belongs.
label(type:str):The label of the plot item for the legend.
data(type:Dataset):The data to be plotted.
For an example, please see the Intermediate and detailed results example.
Note
Detailed results are only available if the user has selected to store them.
This can be by using the store_details=True keyword argument in the
execute method. Because kwargs are passed down through the
WorkflowTree to all the plugins, the store_details=True can be called
in the execute_process method of the
WorkflowTree.
Examples#
Plugin default parameter definition examples#
Example 1: A plugin with a only generic Parameter objects#
The following example shows an incomplete class definition of a plugin with only
four generic Parameter objects.
from pydidas.core.generic_params import get_generic_param_collection
from pydidas.plugins import BasePlugin

class MyPlugin(BasePlugin):

    default_params = get_generic_param_collection(
        "filename",
        "threshold_low",
        "threshold_high",
        "multiplicator",
    )
Back to "Defining plugin Parameters" section (go back to top of the page)
Example 2: A plugin with a mix of generic and custom Parameter objects#
The following example shows an incomplete class definition of a plugin with a
mix of generic and custom Parameter objects.
from pydidas.core import Parameter
from pydidas.core.generic_params import get_generic_param_collection
from pydidas.plugins import BasePlugin

offset_param = Parameter(
    "offset",
    float,
    0,
    name="Data offset",
    tooltip="A constant data offset which is applied to the input data.",
)


class MyPlugin(BasePlugin):

    default_params = get_generic_param_collection(
        "filename",
        "threshold_low",
        "threshold_high",
    )
    default_params.add_param(offset_param)
Back to "Defining plugin Parameters" section (go back to top of the page)
Example 3: A plugin with mostly custom Parameter objects#
The following example shows an incomplete class definition of a plugin with
ParameterCollection including generic and custom Parameter objects defined
outside the plugin.
from pydidas.core import Parameter, ParameterCollection
from pydidas.core.generic_params import get_generic_parameter
from pydidas.plugins import BasePlugin

class MyPlugin(BasePlugin):

    default_params = ParameterCollection(
        Parameter(
            "offset",
            float,
            0,
            name="Data offset",
            tooltip="A constant data offset which is applied to the input data.",
        ),
        Parameter(
            "noise",
            float,
            0,
            name="Random noise level",
            tooltip="The random noise level which is added to each input data point.",
        ),
        get_generic_parameter("filename"),
    )
Back to "Defining plugin Parameters" section (go back to top of the page)
Handling dynamic data dimensionality example#
This example shows a fully functional plugin which can handle multi-dimensional
input. The plugin adds a one-dimensional np.ndarray to the input
data.
import numpy as np

from pydidas.core import (
    Dataset, Parameter, ParameterCollection, UserConfigError, get_generic_parameter
)
from pydidas.core.utils import process_1d_with_multi_input_dims
from pydidas.core.constants import PROC_PLUGIN
from pydidas.plugins import ProcPlugin


class AddOneDimensionalData(ProcPlugin):

    default_params = ParameterCollection(
        get_generic_parameter("process_data_dim"),
        Parameter(
            "offset_array",
            np.ndarray,
            np.zeros((5)),
            name="1D offset array",
            tooltip="The offset array to be added to the 1d input data",
        ),
    )
    plugin_name = "Add one-dimensional data"
    plugin_type = PROC_PLUGIN
    basic_plugin = False
    input_data_dim = -1
    output_data_dim = -1

    @process_1d_with_multi_input_dims
    def execute(self, data: Dataset, **kwargs: dict) -> Dataset:
        _arr = self.get_param_value("offset_array")
        if data.shape != _arr.shape:
            raise UserConfigError(
                "The offset array must have the same shape as the input data."
            )
        data += _arr
        return data, kwargs
Now, when testing the plugin with 1-dimensional data, the plugin will simply process the input data:
>>> p = AddOneDimensionalData()
>>> p.set_param_value("offset_array", np.arange(5))
>>> data_1d = Dataset(np.zeros((5)
...     axis_ranges=[5 * np.arange(5)],
...     axis_labels=["x"],
...     axis_units=["px"],
...     data_label="Test data",
...     data_unit="a.u.",
...     )
>>> new_data, _ = p.execute(data_1d)
>>> print(new_data)
Dataset(
axis_labels: {
    0: 'x'},
axis_ranges: {
    0: array([ 0, 5, 10, 15, 20])},
axis_units: {
    0: 'px'},
metadata: {},
data_unit: a.u.,
data_label: Test data,
array([0., 1., 2., 3., 4.])
)
When testing the plugin with multi-dimensional data, the plugin will
automatically apply the algorithm in the decorated execute method to
one-dimensional slices of the input data. By default, the processed dimension is
the last dimension (see first part of the example below). When the
process_data_dim Parameter is set to 0, the first dimension will be
processed (compare second part of the example).
>>> p = AddOneDimensionalData()
>>> p.set_param_value("offset_array", np.arange(5))
>>> data_2d = Dataset(
...     np.zeros((5, 5)),
...     axis_ranges=[5 * np.arange(5), 12 - np.arange(5)],
...     axis_labels=["x", "y"],
...     axis_units=["px", "px"],
...     data_label="Test data",
...     data_unit="a.u.",
... )
>>> new_data, _ = p.execute(data_2d.copy())
# Note: For brevity, only the numerical data of the output Dataset is printed.
>>> print(new_data.array)
[[0. 1. 2. 3. 4.]
 [0. 1. 2. 3. 4.]
 [0. 1. 2. 3. 4.]
 [0. 1. 2. 3. 4.]
 [0. 1. 2. 3. 4.]]
# Now, we change the processing dimension:
>>> p.set_param_value("process_data_dim", 0)
>>> new_data, _ = p.execute(data_2d)
>>> print(new_data.array)
[[0. 0. 0. 0. 0.]
 [2. 2. 2. 2. 2.]
 [1. 1. 1. 1. 1.]
 [3. 3. 3. 3. 3.]
 [4. 4. 4. 4. 4.]]
Note
The plugin modifies the input Dataset in place. Therefore, the input
dataset will also be changed. Copying of the data in the input is only
necessary in this example. In a proper pydidas Workflow, the framework will
automatically pass a copy of the input data to the plugin if the input data
is passed to more than one plugin.
Back to "Handling dynamic data dimensionality" section (go back to top of the page)
Intermediate and detailed results example#
This example uses the AddOneDimensionalData plugin from the previous
example (see Handling dynamic data dimensionality example) and adds
functionality to handle intermediate results.
class AddOneDimensionalDataWithDetails(AddOneDimensionalData):
    plugin_name = "Add one-dimensional data with details"

    def __init__(self):
        super().__init__()
        self._details = {}

    @property
    def detailed_results(self) -> dict:
        return self._details

    @process_1d_with_multi_input_dims
    def execute(self, data: Dataset, **kwargs: dict) -> tuple[Dataset, dict]:
        self.store_input_data_copy(data)
        new_data, kwargs = AddOneDimensionalData.execute(self, data, **kwargs)
        if kwargs.get("store_details", False):
            self._details = {None: self._create_detailed_results(data, new_data)}
        return new_data, kwargs

    def _create_detailed_results(self, output: Dataset) -> dict:
        return {
            "n_plots": 2,
            "plot_titles": {0: "Input and Output", 1: "Offset array"},
            "plot_ylabels": {
                0: "intensity / a.u.",
                1: "intensity / a.u.",
            },
            "metadata": "",
            "items": [
                {"plot": 0, "label": "input data", "data": self.input_data},
                {"plot": 0, "label": "output data", "data": output},
                {
                    "plot": 1,
                    "label": "offset",
                    "data": Dataset(self.get_param_value("offset_array"))
                },
            ],
        }
Now, when testing the plugin, the detailed results can be accessed through the
detailed_results property or automatically in the
Workflow test frame when using the GUI.
As example, the following code snippet shows how to access the detailed results,
first for a one-dimensional input Dataset, then for a two-dimensional input
Dataset.
>>> p = AddOneDimensionalDataWithDetails()
>>> p.set_param_value("offset_array", np.array((4, 2, 0, 1, 3)))
>>> data_1d = Dataset(np.array((1, 1, 0, 0, 0)), axis_labels=["x"])
>>> data_2d = Dataset(
...     np.tile(np.array((1, 1, 0, 0, 0)), (5, 1)),
...     axis_labels=["x", "y"],
... )

# First, we test the plugin with a one-dimensional input Dataset:
>>> new_data_1d, _ = p.execute(data_1d.copy(), store_details=True)
>>> (new_data_1d - data_1d).array
array([4, 2, 0, 1, 3])
# Detailed results will now be stored using the generic key `None`:
>>> p.detailed_results.keys()
dict_keys([None])
>>> p.detailed_results[None].keys()
dict_keys(['n_plots', 'plot_titles', 'plot_ylabels', 'metadata', 'items'])

# Now, we test the plugin with a two-dimensional input Dataset:
>>> new_data, _ = p.execute(data_2d.copy(), store_details=True)
>>> (new_data - data_2d).array
array([[4., 2., 0., 1., 3.],
       [4., 2., 0., 1., 3.],
       [4., 2., 0., 1., 3.],
       [4., 2., 0., 1., 3.],
       [4., 2., 0., 1., 3.]])
>>> p.detailed_results.keys()
dict_keys(['x: 0.0000 ', 'x: 1.0000 ', 'x: 2.0000 ', 'x: 3.0000 ', 'x: 4.0000 '])
The representation in the GUI looks like the following:
Back to "Intermediate and detailed results" section (go back to top of the page)